如何打造一个舒适的算法竞赛编程环境
从开始接触算法竞赛到现在堪堪入门算法竞赛以来,写算法题的平台改变了很多次,但是追求舒适、方便、快捷的开发环境的想法从来没有改变过。
最开始的时候用的是CodeBlocks,这个IDE可以生成template,但是并没有很好的LSP支持。后来对编程环境熟悉一些之后,就没用这种开发方式了。
之后很长的一段时间,开发环境换到了Vim,主要是用SpaceVim + coc-clangd + Copilot,这种方式在Linux和macOS上面的体验还不错,但是在Windows下面体验效果很差,主要是因为Windows下面的GNU C++的编译器的环境有点不太方便。因为没有办法统一三端的体验,后面也放弃了这种开发方式。
现在的开发方式主要依赖VSCode + DevContainer + clangd + Copilot。VSCode提供了丰富的插件,可以依旧使用Vim和JetBrains的键位习惯。DevContainer提供了一个跨平台统一的开发环境,无论是Windows、Linux还是macOS,都拥有一致的开发体验。
环境搭建
之前做了一个Algorithm的竞赛用Repo,链接在这[2]。
里面的文件夹结构如下图所示。
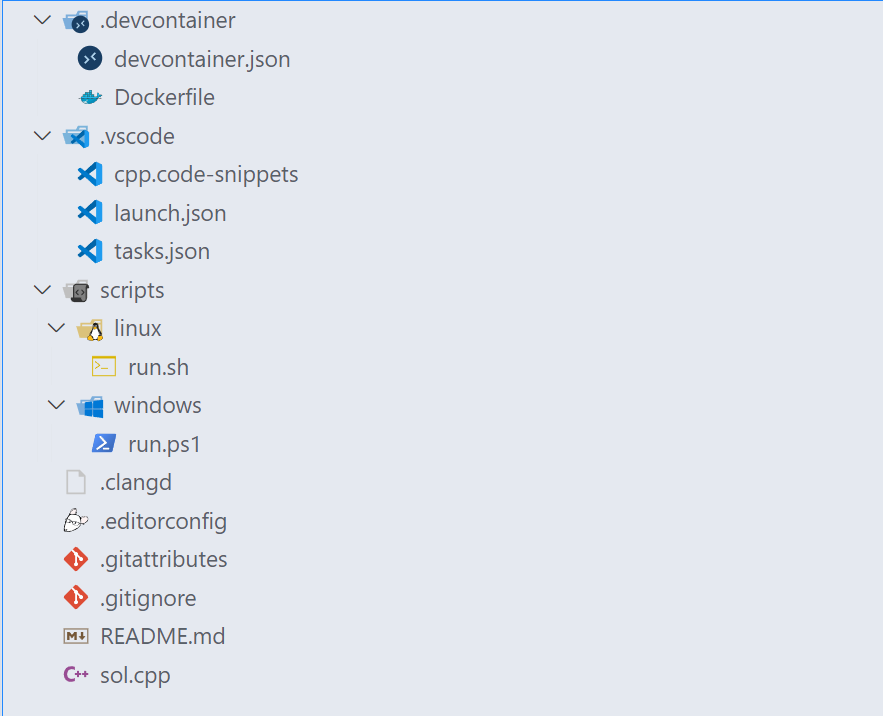
下面介绍一下具体的文件和文件夹用途
- 📂
.devcontainer/: Dev Container的配置文件夹。- 📄
devcontainer.json: Dev Container的配置文件。 - 📄
Dockerfile: Dev Container用到的自定义容器的配置文件,如果使用官方的容器就不需要定义这个文件。
- 📄
- 📂
.vscode/: VSCode工作区配置文件。- 📄
cpp.code-snippets: VSCode 各个语言的代码块,可以输入缩写补充完整的代码块。 - 📄
launch.json: VSCode Debug & Run的配置文件。 - 📄
tasks.json: VSCode 自定义任务。
- 📄
- 📂
scripts: 自定义的一些脚本。- 📂
linux: Linux下面的脚本。- 📄
run.sh: 这个脚本是在Linux下运行所有测试样例。
- 📄
- 📂
windows: Windows下面的脚本。- 📄
run.ps1: 这个脚本是在Windows下运行所有测试样例。
- 📄
- 📂
- 📄
.clangd: clangd配置文件。 - 📄
.editorconfig: EditorConfig配置文件。 - 📄
.gitattributes: Git配置文件。 - 📄
.gitignore: Git Ignore文件,可以设定git add的时候,默认不包含的文件。 - 📄
README.md: Read Me。 - 📄
sol.cpp: C++语言的一个模板文件。
Dev Container 相关环境
Dev Container相关的环境主要是配置Code编译、运行的系统环境。在 algorithm[2]中,主要配置文件是.devcontainer/devcontainer.json和.devcontainer/Dockerfile。
.devcontainer/devcontainer.json的文件内容如下所示。
// For format details, see https://aka.ms/devcontainer.json. For config options, see the
// README at: https://github.com/devcontainers/templates/tree/main/src/ubuntu
{
    "name": "Algorithm", // 定义Dev Container名称
    // Or use a Dockerfile or Docker Compose file. More info: https://containers.dev/guide/dockerfile
    "build": {
        "dockerfile": "Dockerfile" // 定义自定义的Dockerfile路径
    },
    "remoteUser": "root",
    "customizations": {
        "vscode": {
            "extensions": [ // 定义VSCode的工作区插件
                "github.vscode-github-actions",
                "GitHub.copilot",
                "EditorConfig.EditorConfig",
                "vadimcn.vscode-lldb",
                "llvm-vs-code-extensions.vscode-clangd",
                "SanaAjani.taskrunnercode"
            ]
        }
    },
    "overrideCommand": false // 启动容器的时候,不Override容器的启动命令
}插件SanaAjani.taskrunnercode的用途是可以在侧边栏直接鼠标点击运行.vscode/tasks.json里面的任务。
接下来看一下Dockerfile。
# 导入基础镜像GCC
FROM gcc
# 导入基础镜像Clang
# FROM silkeh/clang

# 更新包数据库
RUN apt-get update
# 安装必要的软件包
RUN apt-get install -y gdb build-essential curl sed unzip git jq libssl-dev ca-certificates
RUN mkdir ~/tool && mkdir ~/tool/bin

# 安装ccs
RUN curl -L $(curl -s https://api.github.com/repos/dianhsu-official/ccs/releases/latest | jq ".assets[0].browser_download_url" | cut -d '"' -f 2) -o dist.zip && unzip dist.zip && rm dist.zip && mv ccs ~/tool/bin/ccs && chmod +x ~/tool/bin/ccs

# 安装clangd
RUN curl -L $(curl -s https://api.github.com/repos/clangd/clangd/releases/latest | jq ".assets[0].browser_download_url" | cut -d '"' -f 2) -o dist.zip && unzip dist.zip && rm dist.zip && mv clangd_*/ ~/tool/clangd

# 如果想用zsh的话,可以把下面的注释取消掉。
# RUN apt-get install -y zsh
# RUN apt-get install -y git zsh \
#     && git clone https://github.com/ohmyzsh/ohmyzsh.git ~/.oh-my-zsh \
#     && cp ~/.oh-my-zsh/templates/zshrc.zsh-template ~/.zshrc \
#     && usermod -s /bin/zsh root

RUN ln -s ~/tool/clangd/bin/clangd /usr/bin/clangd
RUN ln -s ~/tool/bin/ccs /usr/bin/ccs

RUN apt autoremove -y \
    && apt clean -y \
    && rm -rf /var/lib/apt/lists/*

CMD ["/usr/bin/ccs", "-w", "/workspaces/algorithm", "-v", "-t", "/workspaces/algorithm/sol.cpp", "-o"]ccs[1]的主要功能是解析样例和生成模板代码。ccs的Usage如下所示。ccs需要搭配Competitive Companion[3],本质上ccs是一个简单的web服务器,Competitive Companion将解析好的样例和题目信息发送到ccs,ccs根据这些题目信息生成样例文件。至于模板文件则是通过ccs的执行参数中的templates来生成的。目前阶段,ccs生成模板代码只是简单copy文件,后来我想可以进行一些字符替换,比如替换时间和用户名什么的。
Usage: ccs [OPTIONS]

Options:
  -w, --workspace <WORKSPACE>  store the workspace path [default: ]
  -t, --templates <TEMPLATES>  templates: src/main.rs, src/model.rs, src/template.rs [default: ]
  -o, --open-by-vscode         allow open by vscode
  -p, --port <PORT>            server port [default: 27121]
  -v, --verbose                verbose mode
  -h, --help                   Print help
-V, --version Print version因为我的代码文件夹会默认挂载到容器中的/workspaces/algorithm目录下,所以我把工作区目录设定为/workspace/algorithm,生成的代码就会在代码文件夹里面了,templates是模板代码的路径,如果需要设定多个模板代码,可以用逗号隔开多个路径就可以了。
dev container相关的配置主要就是这些了,接下来介绍下VSCode相关的配置。
VSCode相关的配置
VSCode相关的配置主要定义了如何编写、编译、运行、测试和Debug代码文件的一些策略和命令。
.vscode/cpp.code-snippets文件中,我定义了一个代码块,如下所示。
{
	// Place your algorithm 工作区 snippets here. Each snippet is defined under a snippet name and has a scope, prefix, body and
	// description. Add comma separated ids of the languages where the snippet is applicable in the scope field. If scope
	// is left empty or omitted, the snippet gets applied to all languages. The prefix is what is
	// used to trigger the snippet and the body will be expanded and inserted. Possible variables are:
	// $1, $2 for tab stops, $0 for the final cursor position, and ${1:label}, ${2:another} for placeholders.
	// Placeholders with the same ids are connected.
	// Example:
	// "Print to console": {
	// 	"scope": "javascript,typescript",
	// 	"prefix": "log",
	// 	"body": [
	// 		"console.log('$1');",
	// 		"$2"
	// 	],
	// 	"description": "Log output to console"
	// }
	"Disjoint Union": {
		"scope": "cpp",
		"prefix": "dsu",
		"body": [
			"class DSU {",
			"public:",
			"  vector<int> fa;",
			"  vector<int> size;",
			"  DSU(int n): fa(n), sz(n, 1) {",
			"    iota(fa.begin(), fa.end(), 0);",
			"  }",
			"  int tf(int x) {",
			"    if (fa[x] == x) {",
			"       return x;",
			"    }",
			"    return fa[x] = tf(fa[x]);",
			"  }",
			"  void mg(int x, int y) {",
			"    int a = tf(x);",
			"    int b = tf(y);",
			"    if (a == b) {",
			"      return;",
			"    }",
			"    if (size[a] < size[b]) {",
			"      swap(a, b);",
			"    }",
			"    fa[b] = a;",
			"    size[a] += size[b];",
			"  }",
			"};"
		]
	}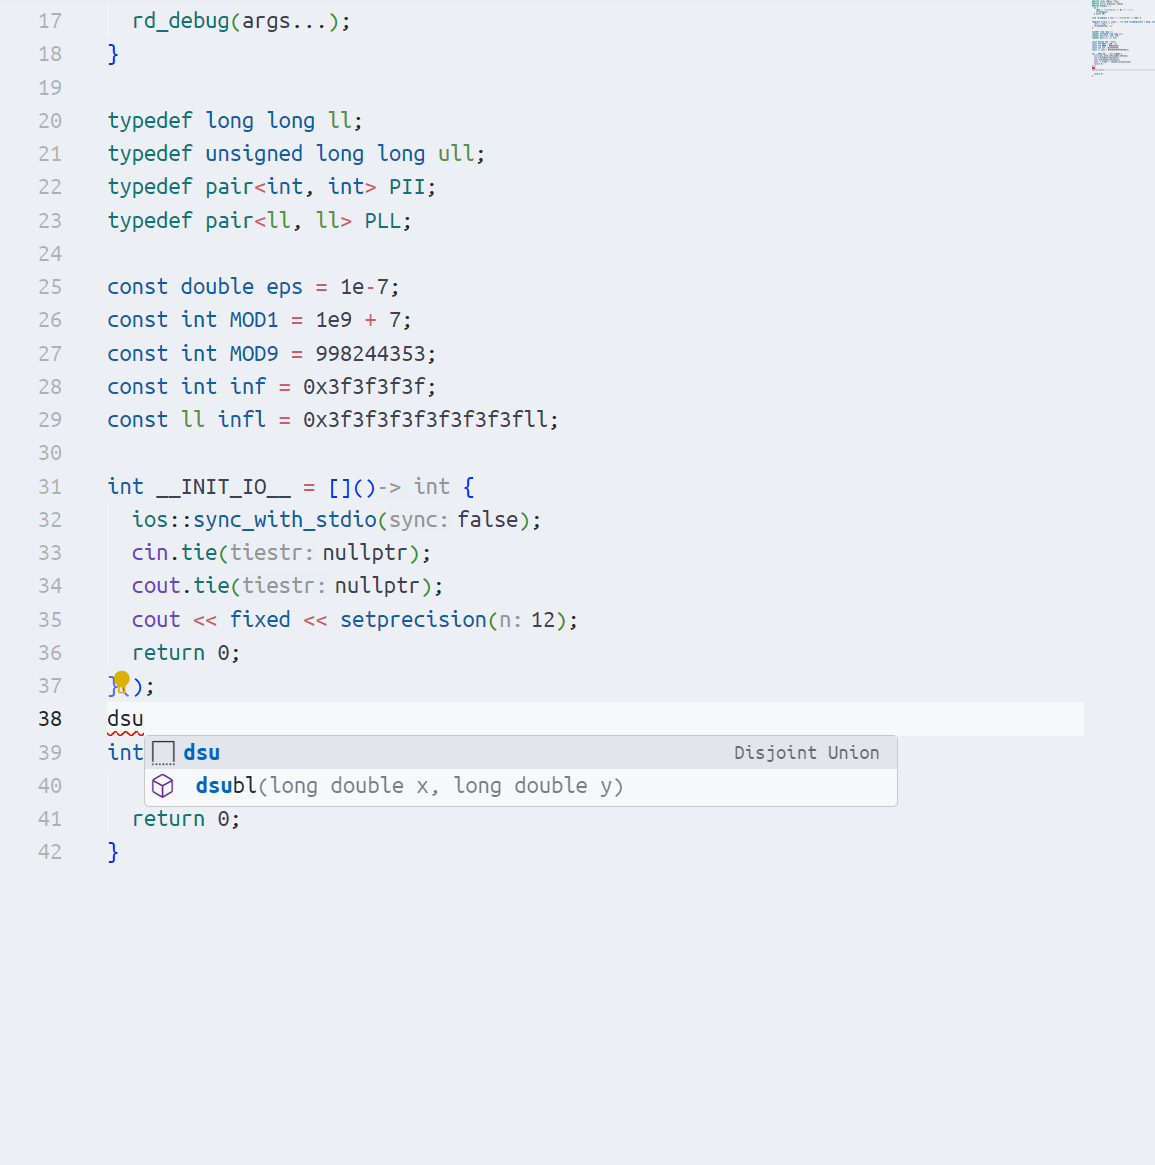
}当在C++源文件中输入dsu的时候,就会有个代码段的提示。选中这个提示,就会有对应的代码段插入到C++的源文件当中。
.vscode/launch.json中定义的是debug文件的配置,参考文件内容如下所示。
{
    // 使用 IntelliSense 了解相关属性。
    // 悬停以查看现有属性的描述。
    // 欲了解更多信息,请访问: https://go.microsoft.com/fwlink/?linkid=830387
    "version": "0.2.0",
    "configurations": [
        {
            "type": "lldb",
            "request": "launch",
            "name": "Build & Run (C++)",
            "program": "${fileDirname}/run.elf",
            "args": [],
            "cwd": "${fileDirname}",
            "preLaunchTask": "build cpp", // debug之前先运行build cpp的task,这个task定义在.vscode/tasks.json中
            "stdio": "${fileDirname}/01.i.txt", // 重定向标准输入到对应文件目录下的 01.i.txt,如果需要debug其他的文件,就需要手动改一改了
        }
    ]
}
这个launch需要当前焦点窗口在题目所在的目录的C++ Source文件上面。在执行Build & Run (C++)之前,需要先运行build cpp这个task,一方面是需要保证本地有run.elf这个文件,另一方面是为了保证run.elf是最新的状态。可以在VSCode中打上断点,然后通过Build & Run进行Debug。
接下来看一下.vscode/tasks.json里面的文件内容。
{
    // See https://go.microsoft.com/fwlink/?LinkId=733558
    // for the documentation about the tasks.json format
    "version": "2.0.0",
    "tasks": [
        {
            "label": "build cpp",   // 生成elf的task
            "type": "shell",
            "linux": {
                "command": "g++",
                "args": [
                    "-g",
                    "${file}",
                    "-o",
                    "${fileDirname}/run.elf"
                ],
            },
            "options": {
                "cwd": "${fileDirname}"
            },
            "problemMatcher": []
        },
        {
            "label": "run cpp",     // 本地运行所有测试样例的task
            "type": "shell",
            "linux": {
                "command": "${workspaceFolder}/scripts/linux/run.sh ./run.elf"
            },
            "options": {
                "cwd": "${fileDirname}"
            },
            "dependsOn": [
                "build cpp"
            ],
            "problemMatcher": []
        }
    ]
}目前的所有的Task都是根据Linux环境设定的。build cpp主要是生成可执行文件,run cpp是通过脚本scripts/linux/run.sh运行测试样例。
scripts/linux/run.sh的文件内容如下所示。
# $1: executable file
for i in `ls *.i.txt`; do
    id=`echo $i | cut -d'.' -f1`
    echo -n "Running test case $id ... "
    $1 < $i > $id.a.txt # 重定向stdio到 $i,重定向stdout到 $id.a.txt
    cnt=`diff -Z $id.o.txt $id.a.txt | wc -l`   # 统计输出文件和期望输出的不同的行数
    if [ $cnt -gt 0 ]; then
        echo -e "\033[0;31mFailed\033[0m." # 输出红色的 Failed
        code --diff $id.o.txt $id.a.txt     # 通过VSCode来显示输入文件和期望输出的比较
    else
        echo -e "\033[0;32mPassed\033[0m."  # 输出绿色的 Passed
    fi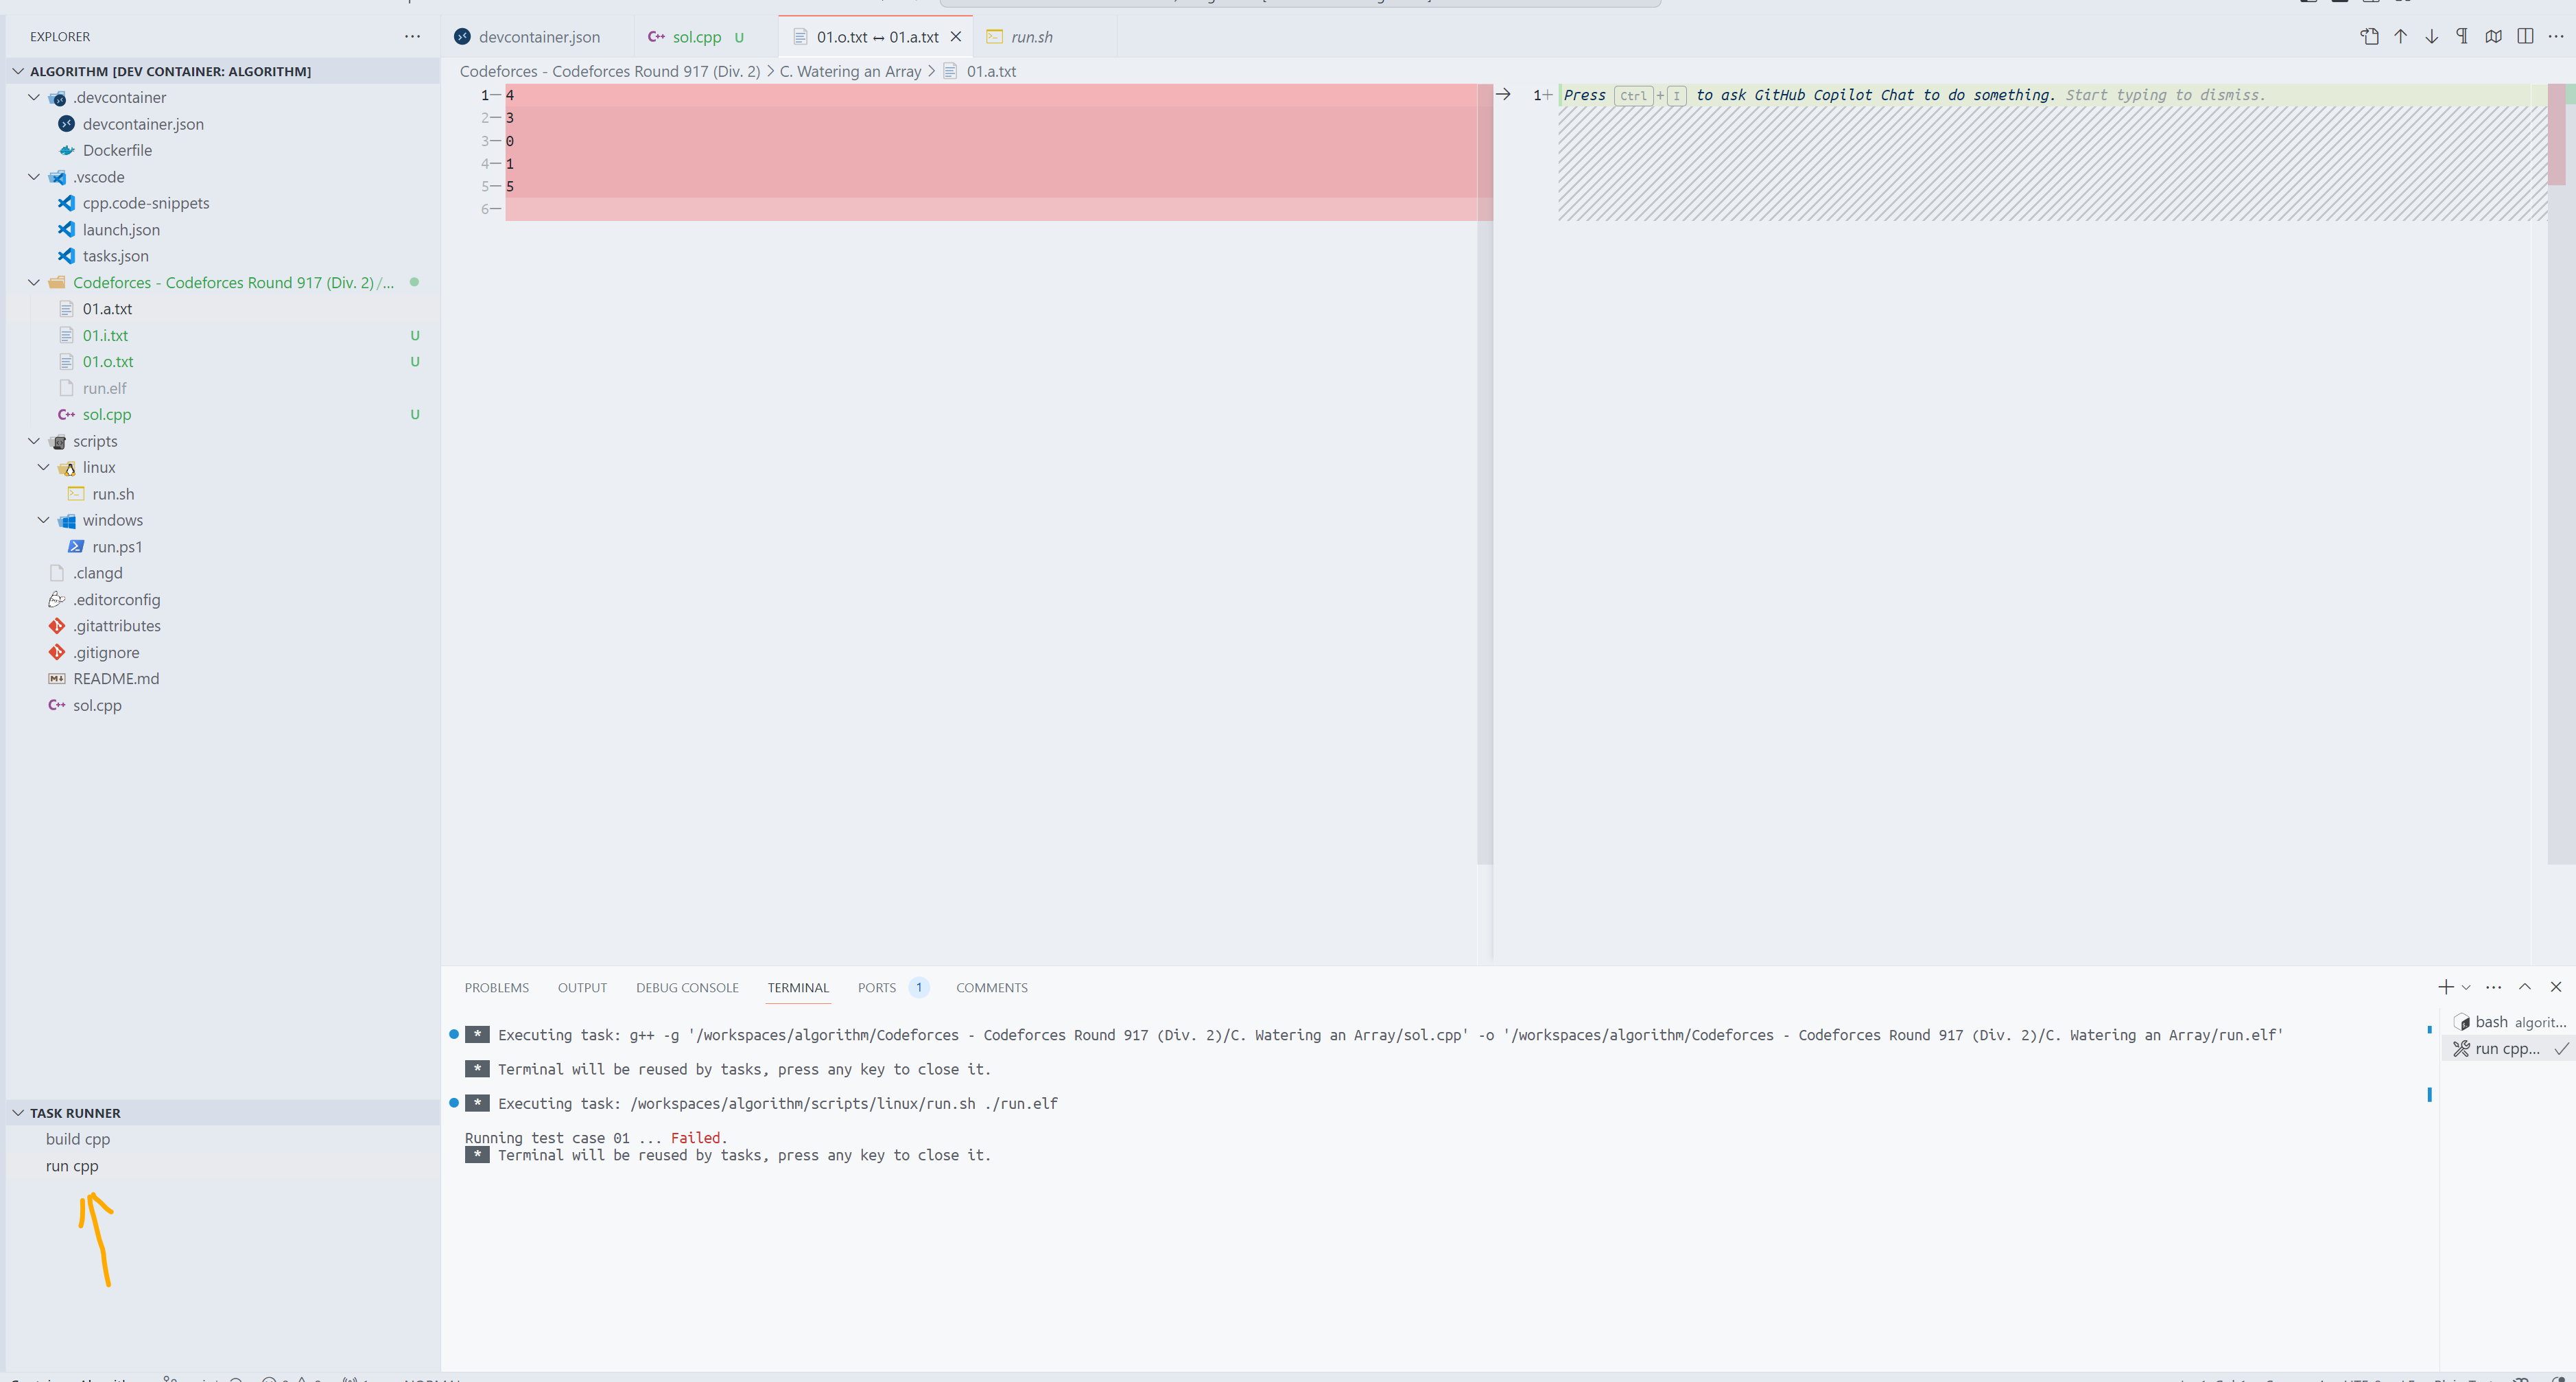
done点击左下角的run cpp这个task的运行效果如下图所示。xx.o.txt是样例输出,xx.a.txt是程序的输出,下图中的Code没写相关的逻辑,所以程序的输出是空白的。
主要的配置文件已经介绍完毕,其余的Git、EditorConfig和clangd相关的配置文件则需要根据个人需求进行配置。